 |
The Sanicare Hand Bidet you have ordered can be installed in a variety of convenient locations; either on the left or right side of your toilet. The only limitation is the length of the flexible hose.
Although we have provided the most common plumbing fittings, should this unit not fit your toilet's plumbing we suggest that you take your bidet to your local hardware store to find the correctly sized fitting/adapter. |
| Installation: |
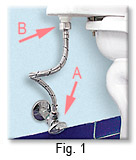 |
1. Turn off the water valve at the base of the wall behind (near) the toilet as shown in Fig. 1-A
2. Flush your toilet to drain all of the water from the toilet tank. A small amount of water may remain in the tank, so you will want a small bowl and/or towel to catch it when you remove the hose in the next step.
3. Disconnect the hose at the underside of the tank as shown in Fig. 1-B
|
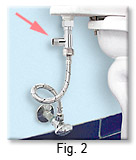 |
4. Install The T-Connector fitting as shown in Fig.2
Connecting the T-fitting to the toilet and then the water supply hose to the bottom of the T-fitting.
Use a piece of cloth or thin cardboard to protect the polished fitting from being scratched by the wrench. |
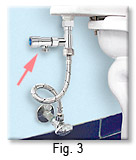 |
5. Attach the Ceramic Shut-Off/Flow Control Valve to the outlet branch of the T Connector as shown in Fig.3
Be sure that the rubber gasket (washer) is in place between the fittings.
Tighten Well. |
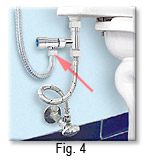 |
6. Connect the flexible spiral metal bidet hose to the to the valve by placing the rubber gasket between the hose nut and the valve fitting. Tighten well. (See Fig. 4)
7. Direct the free end of the flexible hose into the toilet bowl and then open the valves to flush out the bidet hose to remove any residue before connecting to the in-line valve and hand bidet. |
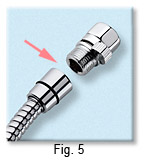 |
8. (Optional) Attach the In-Line Control Valve to the free end of the bidet hose as shown in Fig.5.
Be sure to insert a rubber gasket between the valve and the hose.
Tighten well. |
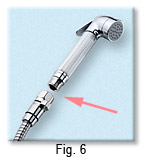 |
9. Attach the Hand Bidet Spray to the In-line Valve as shown in Fig. 6 (or to the free end of the hose if you did not install the optional In-Line Valve).
Be sure to insert a rubber gasket. Some Hand Bidet models may require a second rubber gasket to achieve a tight, leak-free connection.
Test The Hand Bidet to ensure that there are no leaks |
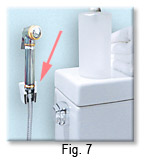 |
10. Attach the Hand Bidet Holder/Wall Bracket to the wall at a convenient and comfortable location using the screws and wall anchors provided as shown in Fig.7.
When mounting on a tile wall surface it is highly recommended that you drill the holes for the screws and wall anchors into the grout lines between the tiles to avoid damaging or cracking a tile. |
Product Installation and Recommendations:
- The water pressure should be between 30 - 75 psi. This hand Bidet is a low-pressure device and for safety reasons not designed for connection to high-pressure outlets.
- Do not use toilet cleaners containing hydrochloric acid (HCL) to clean this bidet
- To avoid scratching the finish of your new bidet do not use abrasives such as a stiff brush, steel wool, or abrasive cleaners. Use a soft cloth to polish your Renaissance Hand Bidet to keep it looking bright and new.
- When not in use it is recommended that you turn the Ceramic Control Valve off to avoid any possible leakage.
- Should you experience any problems with your hand bidet it is recommended that you first disassemble and clean the unit before calling Technical Support at 1-800-878-4791 (option #3). Sanicare is always there to help you!
Troubleshooting:
Problem Checkpoint Solution
-Cannot close water 1 Disassemble and clean
-Water leaks around water 1 Disassemble and clean
control plate
-Water does not flow 1 Use a cleaning pin by piercing through
smoothly the hose of the rinsing plate.
-No or low water flow 1 Disassemble and clean
|
